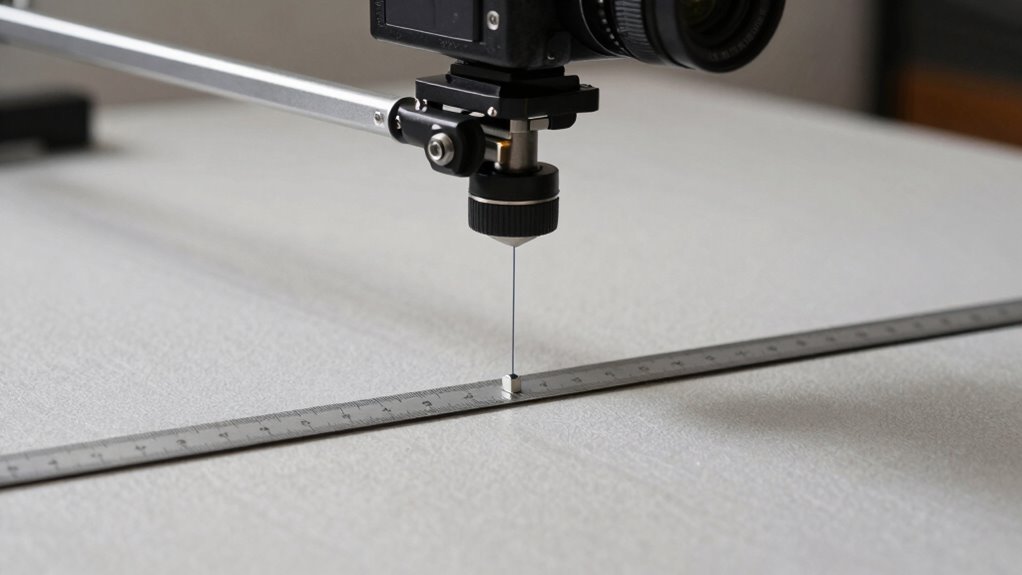
The most important measurement to prevent soft focus when using a copy stand is ensuring the distance between your camera lens and the subject is precise. You want to measure this distance carefully, using a ruler or tape measure, and adjust your focus accordingly. Proper alignment and consistent spacing are key to sharp images. If you keep these details in check, your photos will stay crisp; explore further to learn how to calibrate your setup perfectly.
Key Takeaways
- Measure the precise distance between the lens and the subject before focusing to ensure sharpness.
- Use a ruler or tape measure for accurate distance measurement during setup.
- Fine-tune focus based on this measurement to prevent soft focus caused by misalignment.
- Employ focus targets or test charts at the working distance for calibration accuracy.
- Regularly recheck and adjust the distance to maintain consistent focus and image clarity.

Desktop Document Holder Stand with 7 Adjustable Positions, Black Metal File Organizer Management Copyholder for Typing Speech Reading A4 Letter Music Book Tablet Office, with Paper Clip and Line Guide
Great for Body Health: The document holder is adjustable with 7 position at the backstand to adjust height…
As an affiliate, we earn on qualifying purchases.
As an affiliate, we earn on qualifying purchases.
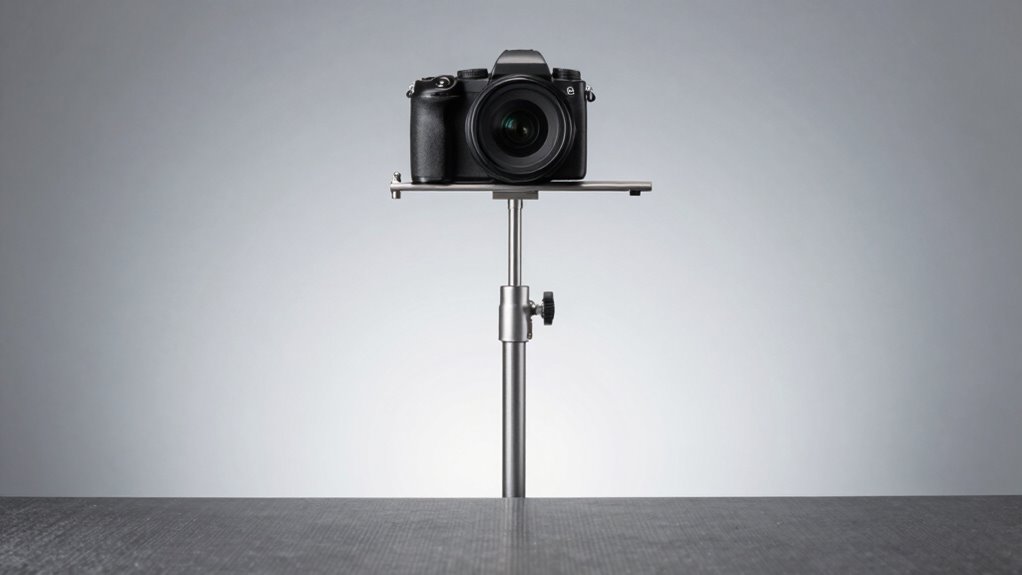
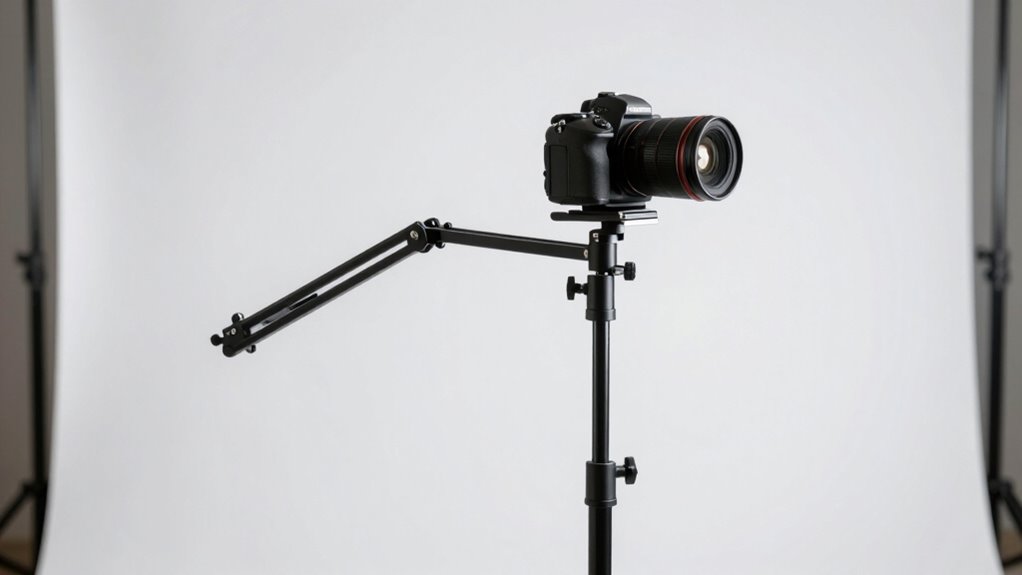
What Does a Copy Stand Do for Photography?

Sure! Here’s the enhanced content following your directions:
—
Have you ever wondered how professional photographers capture sharp, detailed images of flat objects like artwork, documents, or collectibles? A copy stand is essential for this, as it holds your camera perfectly aligned with the subject. It helps you maintain consistent framing, which improves your composition tips and guarantees every shot is uniform. By using proper lighting techniques—like even, diffuse light—you minimize shadows and glare, enhancing clarity. The copy stand prevents camera shake and accidental movement, making sure your images are razor-sharp. With the right setup, your photos will be crisp, well-lit, and true to the original. Ultimately, a copy stand gives you control over the technical aspects, so your focus stays on capturing high-quality, detailed images. Additionally, having a luxury setup can elevate your photography experience, ensuring that you capture the essence of your subjects. This is particularly important when photographing items of significant golf heritage, as the details can enhance their historical value. Incorporating foam rolling techniques into your routine can also help alleviate tension, ensuring you maintain your stamina and focus during long shooting sessions. Investing in car protection accessories can further enhance your photo setup by providing a safe and stable environment for your equipment. Moreover, ensuring color accuracy in your images can significantly improve the overall quality and appeal of your photographs.
—
Let me know if you need any more adjustments!
SHINEOFI Camera Focus Calibration Card Lens Test Chart Color Wheel Chart for CCTV Installation Alignment Indoor Outdoor Use 15.74X11.81In Monitoring Focus Test Tool
Core Functionality: This camera focus adjustment card enhances sharpness and clarity in captured images, allowing for precise calibration…
As an affiliate, we earn on qualifying purchases.
As an affiliate, we earn on qualifying purchases.
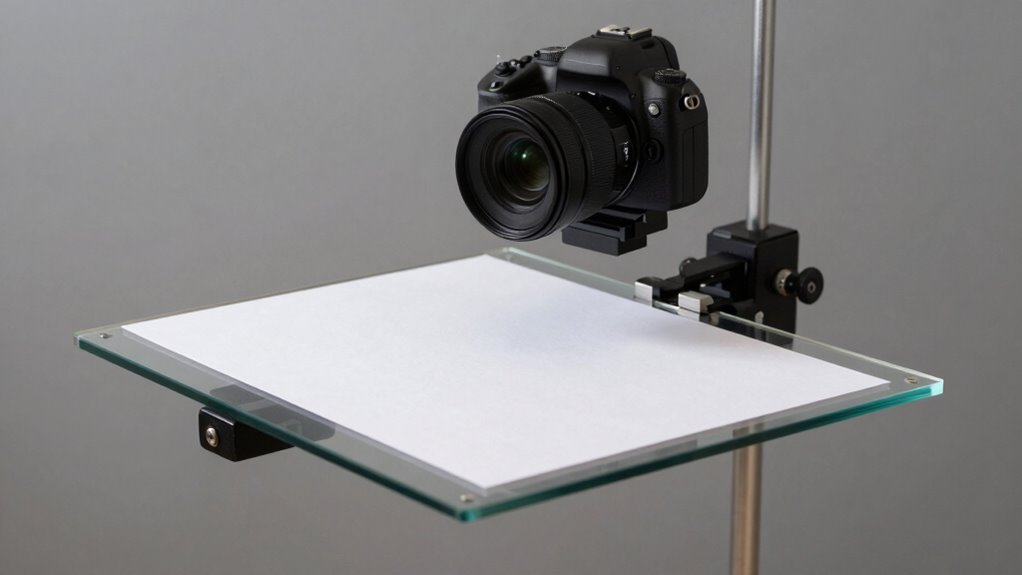
Why Proper Camera Alignment Is Key to Sharp Photos
When your camera isn’t level, your photos can look tilted or uneven. Keeping the focus plane correct guarantees sharpness across the entire image, especially for flat subjects like documents. Also, steady camera alignment prevents shake, so your photos stay clear and crisp. Additionally, incorporating natural light into your shooting environment can enhance the overall quality and warmth of your images. Achieving proper exposure is essential for capturing the true colors and details in your shots. Furthermore, maintaining attention to detail during your setup can significantly improve the final outcome of your photography. Understanding the importance of budgeting for equipment can also help ensure you have the right tools for achieving optimal results. Properly installed projector mounts can also minimize any potential alignment issues, ensuring your setup remains stable.
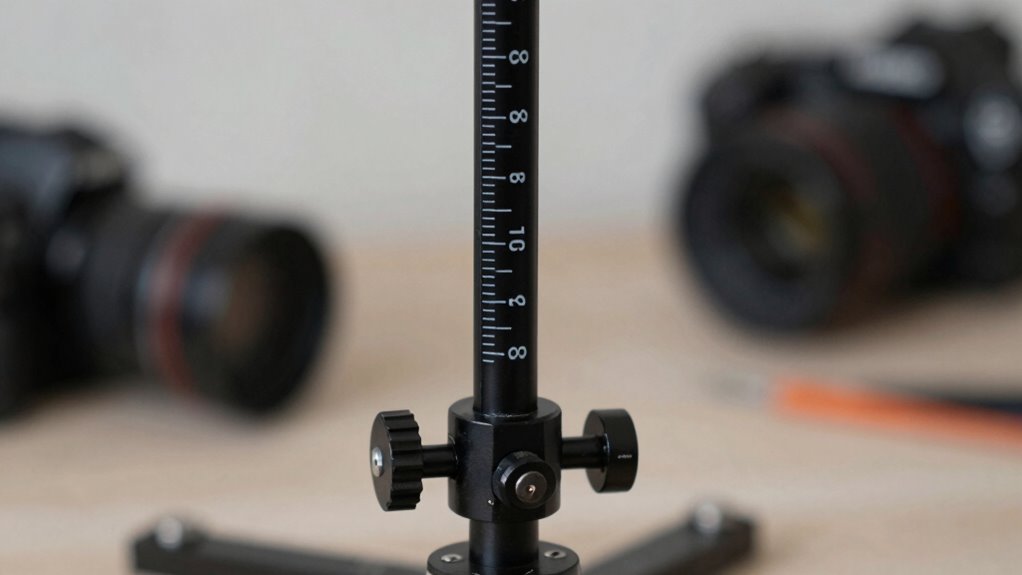
Ensuring Camera Levelness
Ensuring your camera is perfectly level is essential for capturing sharp, professional-looking photos. When your camera is aligned correctly, it prevents soft focus caused by tilted images, ensuring your lighting techniques create even, consistent illumination. Proper levelness also enhances your composition strategies, allowing you to accurately frame your subject without distortion. Use a bubble level or a spirit level on your copy stand to verify alignment before shooting. Take a moment to double-check that the camera is parallel to the surface you’re photographing. This small adjustment can considerably improve image clarity and reduce post-processing corrections. Additionally, maintaining proper air quality in your shooting environment can also impact the overall clarity and vibrancy of your images. Consistently maintaining camera levelness simplifies your workflow and guarantees your photos stay crisp, clear, and well-composed. Additionally, exploring new frontiers in digital content can enhance your photographic practice and overall aesthetic. Consider how landscaping to enhance natural beauty can impact the overall aesthetic of your photography.
Maintaining Proper Focus Plane
Proper camera alignment is essential for maintaining the correct focus plane, which directly impacts the sharpness of your photos. When your camera is properly aligned, your subject remains in focus across the entire image, avoiding soft edges or blurry areas. To achieve this, consider your lighting setup carefully; even lighting helps prevent shadows that can mislead focus. Select a background that’s flat and uniform to reduce distractions and guarantee the focus stays on your subject. Keep these points in mind:
- Use a level on your copy stand to verify alignment
- Adjust the camera height to match the subject’s focal point
- Test different lighting angles for even illumination
- Choose backgrounds with minimal texture for clarity
- Regularly recheck focus and alignment during shoots
These steps help maintain the focus plane, ensuring sharp, professional results.
Avoiding Camera Shake
Camera shake can ruin an otherwise sharp photo, and even slight movements during exposure can lead to blurry results. To avoid this, guarantee your camera is stable and well-aligned on your copy stand. Use proper lighting techniques to reduce the need for long exposures, which heighten the risk of shake. Pay attention to composition principles, such as balancing your setup to minimize accidental movements. Lock your camera in place, and consider using a remote shutter or timer to prevent vibrations caused by pressing the shutter button. Keep the stand on a sturdy surface, and double-check alignment before exposing. Maintaining stability is essential for crisp images, especially when working with fine details or high magnifications. Proper camera alignment and stability make all the difference in achieving sharp, professional-looking results.

General Tools Digital Angle Finder Ruler #822 – 5" Stainless Steel Woodworking Protractor Tool with Large LCD Display
PREVENT WASTE: This digital 5” stainless-steel ruler and angle finder combination tool makes precise, easy and fast measurements.
As an affiliate, we earn on qualifying purchases.
As an affiliate, we earn on qualifying purchases.
The Most Important Measurement to Prevent Soft Focus
Sure! Here’s your revised content with the requested changes:
—
The key to avoiding soft focus is ensuring your camera is perfectly calibrated. You need to measure the proper distance between your lens and the subject carefully, then fine-tune your focus settings accordingly. Accurate focus calibration is essential to achieve crisp, clear images every time. Additionally, consider the proper lamp height for optimal lighting conditions that enhance focus clarity. Using the right firewood techniques can also help you understand how light interacts with your subject, further improving your focus results. Moreover, maintaining engine performance can ensure that your camera gear operates smoothly, contributing to your overall photographic excellence. Understanding the importance of economic transitions can also provide valuable insights into how societal changes may impact the tools and techniques available to photographers. Proper safety precautions when handling your equipment can further prevent mishaps that could lead to soft focus issues.
—
Let me know if you need any more adjustments!
Proper Distance Measurement
Sure! Here’s the revised content following your instructions:
—
Have you ever taken a photo and noticed it turned out soft or blurry? Proper distance measurement is vital to sharp images. To guarantee clarity, you need to precisely position your camera relative to the subject. This involves considering lighting angles and subject positioning, which directly impact focus. Accurate distance measurement:
- Keeps your lens at the ideal distance for sharpness.
- Prevents soft focus caused by incorrect spacing.
- Ensures consistent lighting angles for even illumination.
- Helps you align the camera perfectly with your subject.
- Reduces the need for excessive refocusing or cropping later. Additionally, understanding ergonomics can greatly enhance your overall comfort while shooting, allowing you to maintain better focus on your subject.
Moreover, understanding knife fundamentals can enhance your overall confidence in food photography by ensuring the subject looks its best. For instance, using fresh ingredients can significantly elevate the visual appeal of your photos. Remember, maintaining a positive mindset is crucial for capturing the essence of your subject. Furthermore, adopting smart lifestyle tips can improve your overall approach to photography, allowing you to work more efficiently and creatively.
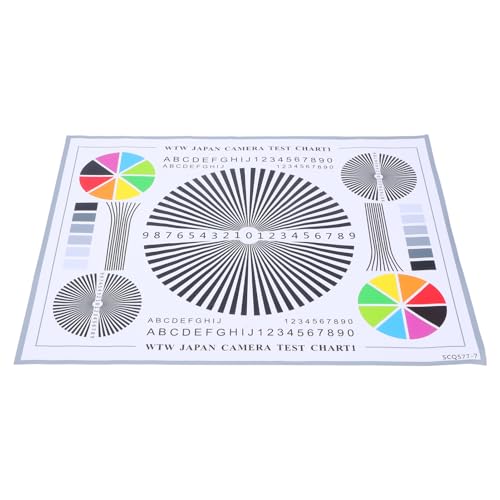
Accurate Focus Calibration
Ensuring your focus is precisely calibrated is the key to sharp, professional-looking images. Focus accuracy directly impacts image clarity, so taking the time to perform proper calibration techniques is essential. Start by using a focus target or test chart, positioning it at your working distance. Use a magnified live view or focus peaking to fine-tune the lens. Adjust your camera or lens settings until the target appears crisp and clear across the entire frame. Regular calibration checks ensure consistent focus accuracy, preventing soft images caused by misfocus. Keep in mind that small adjustments can make a significant difference. By mastering calibration techniques, you’ll ensure your copy stand produces consistently sharp, detailed reproductions every time. Additionally, understanding the importance of user privacy can help you maintain a secure environment for your photography projects. The use of oak wood in your setup can also enhance the overall aesthetic, adding a touch of elegance to your workspace.

JAAGS Equalizer ADAS Camera Leveling Tool, Compatible with Volvo, GTOOL805
EQUALIZER ADAS CAMERA LEVELING TOOL allows for the correct adjustment after reinstallation.
As an affiliate, we earn on qualifying purchases.
As an affiliate, we earn on qualifying purchases.
How to Measure the Correct Distance Between Camera and Subject

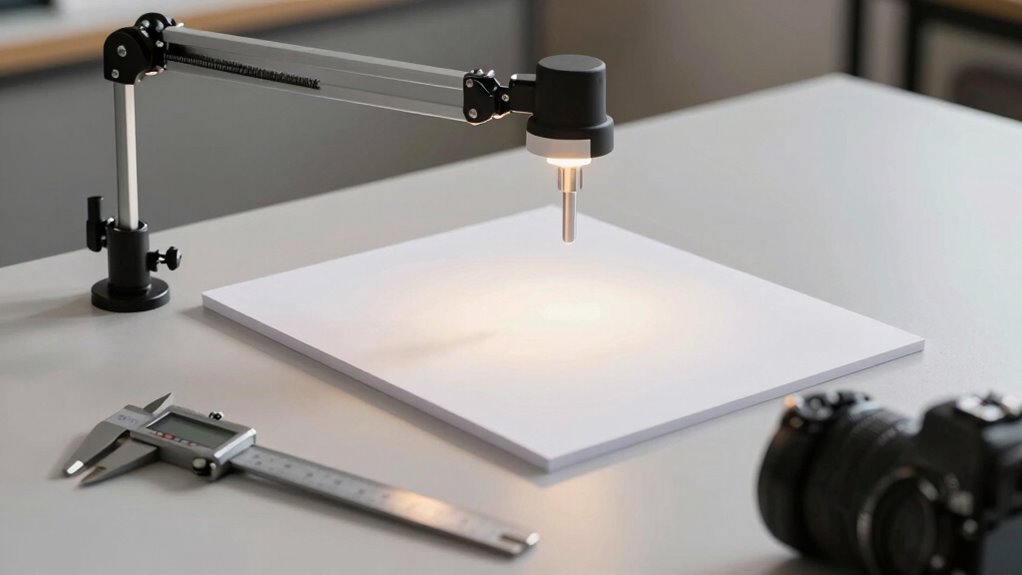
Wondering how to find the right distance between your camera and subject? The key is to balance your lighting techniques with proper camera settings to achieve sharp, detailed images. Start by positioning your camera at a distance where your subject fills the frame without cropping or distortion. Use a tripod for stability and consistent results. Adjust your lighting to evenly illuminate the subject, ensuring shadows aren’t too harsh or soft. Keep in mind, the distance impacts focus, so measure carefully—using a ruler or tape measure for precision. Test different distances, checking the results with your camera’s live view mode. Remember, the right distance varies with lens focal length and subject size, so fine-tuning is essential for crisp, professional photos.
Find the ideal distance by balancing lighting, focus, and lens choice for sharp, professional photos.
- Consider focal length and lens type
- Use live view for precise focus checks
- Adjust lighting for even, shadow-free illumination
- Keep camera settings consistent during measurement
- Measure from the camera’s lens to the subject’s main feature
Tools and Tips for Calibrating Your Copy Stand Accurately
To achieve sharp, consistent images with your copy stand, accurate calibration is a must. Start by checking your lighting setup; even, diffuse light minimizes shadows and soft focus. Use a remote shutter or timer to prevent camera shake during calibration. For background selection, choose a flat, non-reflective surface free of wrinkles or debris. Confirm the background is evenly lit and positioned at the correct distance to avoid shadows or uneven tones. Use a bubble level or digital level tool to verify that your camera and copy stand are perfectly aligned horizontally and vertically. Regularly recheck these settings, especially after adjustments, to maintain consistency. Proper lighting and background choices are key to calibration, helping you prevent soft focus and achieve crisp, professional results.
Common Mistakes That Cause Misalignment and Blurry Images
What are the most common mistakes that lead to misalignment and blurry images when using a copy stand? Poor setup is a frequent culprit. Incorrectly aligning your camera and artwork causes misfocus and soft images. Using improper lighting setups can create shadows or uneven illumination, exacerbating blurriness. Relying solely on post processing techniques to fix issues often leads to loss of detail. Additionally, neglecting to secure your camera or adjust the stand’s height can cause slight shifts during shooting. Finally, overlooking calibration procedures results in misaligned images. To avoid these pitfalls, ensure your camera is perfectly aligned, use consistent lighting, and double-check your stand’s stability. Proper attention to these details prevents soft focus and ensures sharp, professional results.
Troubleshooting Soft Focus: When Your Copy Stand Isn’t Working Right
Soft focus issues often stem from simple setup errors or equipment misadjustments that can be easily overlooked. First, check your lighting angles—incorrect angles can create shadows or uneven illumination that mimic softness. Adjust your lights to guarantee even, direct lighting that minimizes glare and highlights details. Next, review your background setup; a cluttered or uneven background can distract the eye and reduce overall sharpness. Make sure the background is smooth and properly positioned behind your subject. Also, verify that your copy stand is stable and properly aligned, as any wobble or tilt can cause blurriness. Taking these steps helps eliminate common causes of soft focus, ensuring your images come out crisp and clear every time.
Maintaining Consistent Focus During Long Shooting Sessions
When you’re working on a long shoot, maintaining consistent focus becomes increasingly important to guarantee your images stay sharp from start to finish. To achieve this, monitor lighting consistency, as fluctuations can affect your focus accuracy. Keep subject positioning stable to prevent shifts that may throw off your focus plane. Regularly verify your copy stand’s setup to eliminate any drift or misalignment. Use a focusing aid like a fine-threaded focusing knob for precision adjustments. Maintain a steady environment, avoiding vibrations or temperature changes that could impact focus stability. Consistently check your setup throughout the session to catch any deviations early.
- Ensure uniform lighting to prevent focus shifts caused by exposure changes
- Lock your focus after initial calibration for the entire session
- Use markers for precise subject positioning
- Adjust camera controls incrementally to avoid focus drift
- Periodically re-verify focus during lengthy shoots
Upgrading Your Copy Stand for Better Precision and Results

Upgrading your copy stand can considerably enhance your shooting accuracy and overall image quality. Focus on improving your lighting setup by adding adjustable lights or diffusers to eliminate shadows and achieve even illumination. Selecting the right background is equally important; opt for neutral or seamless backdrops to prevent distractions and guarantee your subject stands out. Consider sturdier materials or modular components for better stability and precision during adjustments. Here’s a quick comparison:
| Feature | Current Setup | Upgraded Setup |
|---|---|---|
| Lighting setup | Basic, fixed lights | Adjustable, diffused lighting |
| Background selection | Limited options | Seamless, versatile backdrops |
| Stability | Wobbly stand | Heavy-duty, secure base |
| Adjustability | Manual, limited | Fine-tuned, easy controls |
| Durability | Fragile parts | Heavy, durable components |
Frequently Asked Questions
How Often Should I Calibrate My Copy Stand?
You should calibrate your copy stand at least once every three to six months, depending on how often you use it. Regular calibration guarantees your setup remains accurate, preventing soft focus issues. Incorporate calibration into your routine maintenance tips to catch any alignment shifts early. If you notice blurry images or inconsistent focus, it’s time for an immediate calibration. Consistent maintenance keeps your copy stand functioning effectively for sharp, precise reproductions.
Can a Copy Stand Be Used for Video Recording?
Yes, you can definitely use a copy stand for video recording! Imagine transforming your setup into a cinematic powerhouse. To achieve this, focus on camera stability to keep footage smooth and sharp, and master lighting techniques for professional, eye-catching visuals. With a sturdy copy stand, your videos will look flawless, capturing every detail perfectly—making your content stand out with crisp clarity and dynamic lighting that keeps viewers hooked.
What Type of Camera Is Best for Copy Stand Photography?
You should choose a camera compatible with your copy stand, ideally a DSLR or mirrorless model with a macro lens for sharp detail. These cameras allow precise lighting adjustments, which are essential for clear, focused images. Make sure your camera can be mounted securely and offers manual control over focus and exposure. This setup helps prevent soft focus and guarantees professional-quality results for your copy stand photography.
How Does Ambient Lighting Affect Focus Quality?
Ambient lighting greatly impacts your focus quality by affecting lighting consistency. Inconsistent ambient light can cause shadows or glare, making it harder to achieve focus precision. To maintain sharp images, you should control ambient lighting, using diffusers or additional light sources to create even, stable illumination. This guarantees your camera’s focus stays accurate, reducing soft focus issues and producing clear, detailed copies.
Are There Specific Lenses Recommended for Copy Stand Work?
Choosing the right lens for copy stand work is like selecting the perfect brush for a painting—precision matters. You should look for lenses with excellent lens compatibility and focal length choices that suit your project, typically between 50mm and 100mm. Macro lenses are ideal for detailed work, while prime lenses offer sharpness and clarity. Always guarantee your lens fits your camera mount to avoid compatibility issues.
Conclusion
Mastering the correct measurement between your camera and subject is the key to crystal-clear images. By ensuring proper alignment and calibration, you prevent soft focus and achieve sharp, professional results. Are you ready to take your photography to the next level? Remember, consistent precision isn’t just a detail—it’s the foundation of stunning, focused shots. With the right tools and techniques, you’ll see your images improve dramatically. So, why settle for less when clarity is within your grasp?