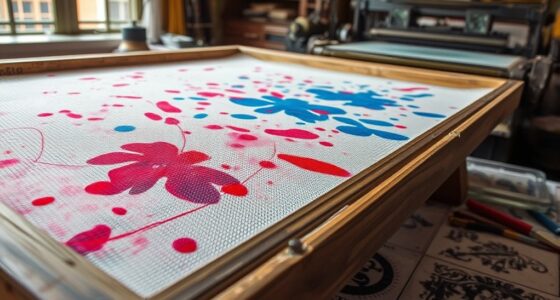
Stencil printmaking, especially screenprinting, involves designing a stencil by cutting shapes from materials like acetate, then attaching it to a mesh screen. To create crisp images, you carefully apply ink with a squeegee, using even pressure and controlled motion. Mastering how much ink to pass through and how to handle the screen guarantees sharp, repeatable prints. If you keep practicing, you’ll discover how to refine your technique and explore more creative possibilities.
Key Takeaways
- Designing and preparing a precise stencil from materials like acetate or Mylar is crucial for sharp, clean images.
- Proper ink application involves even pressure with a squeegee to avoid smudging or bleeding beyond the stencil edges.
- Controlling ink amount and squeegee angle ensures consistent coverage and sharp lines in each print.
- Securing the stencil flat on the screen prevents ink leakage and maintains print quality.
- Practice and patience are essential to master the balance of pressure, speed, and stencil design for successful screenprinting.

Have you ever wondered how artists create bold, repeatable images with minimal tools? The secret often lies in stencil printmaking, particularly in the art of screenprinting. With just a few simple materials, you can produce striking images that are both consistent and vibrant. At the heart of this process is ink application—carefully controlled to guarantee sharp, clean lines—and a well-crafted stencil design that acts as the blueprint for your print. Mastering these elements transforms an ordinary sheet of paper or fabric into a compelling piece of art.
Mastering stencil design and precise ink application creates bold, repeatable screenprints with minimal tools.
The process begins with designing your stencil. This can be as simple or complex as you like, often involving cutting out shapes or patterns from a thin, opaque material such as acetate or Mylar. Your stencil design determines the final image, so precision here is essential. Once you have your stencil ready, you’ll secure it onto your screen. The screen itself is a mesh fabric stretched tightly over a frame, acting as a canvas for your ink. The key to successful stencil printmaking is making sure the stencil stays flat and firmly attached, preventing any ink from bleeding underneath.
When it comes to ink application, think of it as a delicate balance. You want enough ink to pass through the open areas of your stencil, creating a bold image, but not so much that it smudges or spreads beyond your intended design. A squeegee is your best tool here. You’ll load it with a small amount of ink and then pull it across the screen with even pressure. This technique pushes ink through the open parts of your stencil onto your substrate, whether it’s paper, fabric, or another material. Consistent, even strokes help you achieve sharp edges and maintain the integrity of your design.
As you work, pay attention to the angle and pressure of your squeegee. Too much pressure can cause the ink to seep under the stencil, blurring your design. Too little can result in uneven coverage. Practice is key to developing a feel for the right amount of pressure and speed. Once you’ve applied the ink, lift the screen carefully to reveal your print. The result should be a clean, crisp image that repeats identically each time you create a new print, thanks to your well-planned stencil design and controlled ink application.
In the end, successful stencil printmaking hinges on your ability to manipulate ink application and craft precise stencil designs. With patience and practice, you’ll find you can produce bold, consistent images that stand out. Whether you’re creating art, posters, or decorative pieces, mastering these fundamentals opens up endless possibilities for your creative expression. Additionally, understanding compatibility of ink and materials can help prevent smudging and ensure your prints last longer.
Frequently Asked Questions
What Types of Inks Are Best for Stencil Printmaking?
For stencil printmaking, you should use inks that offer excellent ink compatibility and suitable drying times. Plastisol inks are popular because they are vibrant, durable, and compatible with various substrates, but they take longer to dry. Water-based inks dry faster and are eco-friendly, making them ideal for quick projects. Consider your project’s needs when choosing, balancing ink compatibility with desired ink drying times for ideal results.
How Do I Choose the Right Stencil Material?
Think of choosing stencil material as selecting your creative partner; it’s about harmony and purpose. You should consider stencil design techniques and material durability considerations. For intricate designs, opt for thin, flexible materials like acetate or mylar. If durability matters most, thicker materials like cardboard or plastic work better. Your choice depends on how detailed your design is and how many prints you plan to make, ensuring your stencil stands the test of time.
Can Stencil Printmaking Be Done on Fabric?
Yes, you can definitely do stencil printmaking on fabric. It’s a popular choice in textile design and fabric dyeing because it allows you to create detailed, colorful patterns. To guarantee good results, use fabric-specific inks or dyes that bond well with textiles. Make sure your stencil is made of a flexible material so it conforms to fabric surfaces, and carefully apply your ink or dye for crisp, professional-looking designs.
What Are Common Mistakes to Avoid in Screenprinting?
Don’t let mistakes trip you up; they’re often just a sign you’re flying by the seat of your pants. To avoid common issues, guarantee your stencil adheres properly and check for inconsistent ink coverage. If the stencil lifts or ink smears, it’s a sign you need better adhesion. Take your time, use the right tools, and test your setup before the final print to keep everything crisp and clean.
How Do I Clean and Store Screens Properly?
To clean your screens properly, use screen cleaning solutions immediately after printing to prevent ink drying. Scrub gently with a soft brush to remove residual ink and dirt. Store your screens in a cool, dry place, avoiding direct sunlight to prevent warping. Before storing, verify the screens are completely dry. Regular cleaning and proper storage extend your screen’s lifespan and keep your prints crisp and clear.
Conclusion
Now that you’ve grasped the basics of stencil printmaking, you’re ready to bring your ideas to life like a painter with a blank canvas. Think of each print as a splash of color in your creative journey, waiting to burst into vivid reality. With patience and practice, your designs will flow smoothly, turning simple screens into windows of artistic expression. So pick up your tools and let your imagination soar—your masterpiece is just a print away.