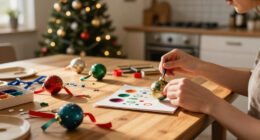

Use this guide to choose, gather, and organize art supplies for DIY holiday crafts such as cards, paper ornaments, gift tags, and simple garlands. It is for beginners and families who want to make several projects without buying materials they will not use. Set aside 45-90 minutes to plan and prepare; craft time will vary by project. You will finish with a project list, the right supplies for each one, and a tidy work area ready for making.

Get art and craft supplies delivered free with Prime
- Fast, free delivery on millions of items
- Prime Video, Amazon Music and more included
- Member-only deals all year

158 Pcs Wooden Christmas Ornaments Unfinished, 50 Pcs Wood Slices for Crafts in 10 Styles with 50 Twine, 50 Colorful Bells & 8 Co…
- ✔ Total listed pieces: 158
- ✔ Wooden shapes: 50 across 10 styles, according to the description
- ✔ Included twine: 50 pieces
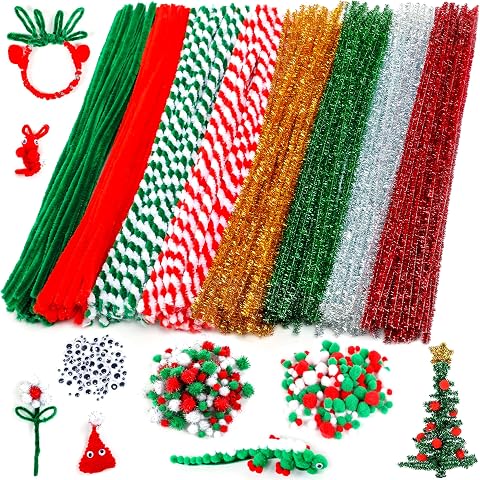
CVNDKN Christmas Pipe Cleaners 700 Pcs Craft Set
- ✔ Total listed pieces: 700
- ✔ Pipe cleaners: 200
- ✔ Pipe cleaner length: 11.8 inches

Livder Christmas Pom Poms Pompoms Red Green White Glitter Fluffy Balls, DIY Art Crafts Decorations Supplies (4 Sizes, 900 Pieces)
- ✔ Approximate quantity: 900 pom poms
- ✔ Sizes: 0.4, 0.6, 0.8, and 1 inch diameters
- ✔ Colors: Red, white, and green
Difficulty: Beginner | Time: 45-90 minutes to plan and gather supplies
What You’ll Need
Tools & Materials:
- Paper and a pen, or a digital note, for a supply list
- Scissors suitable for the people who will use them
- A ruler and pencil
- A tray, box, or basket for sorting supplies
- A protected work surface, such as a washable tablecloth or scrap paper
Knowledge:
- Basic cutting, folding, and gluing
- Awareness of any age-related supervision or accessibility needs among the crafters
Pick projects before shopping. Check cupboards and drawers first, and set a spending limit. If children will craft, choose age-appropriate tools and check product labels for use and cleanup directions.
158 Pcs Wooden Christmas Ornaments Unfinished, 50 Pcs Wood Slices for Crafts in 10 Styles with 50 Twine, 50 Colorful Bells & 8 Co…
When our holiday craft plan ends with decorations we can hang, the wooden set offers the clearest route from supplies to finished pieces. Its ten shapes—including trees, snowflakes, stockings, angels, and blank circles—give each crafter a recognizable starting point, while twine and colorful bells help turn decorated blanks into ornaments. The eight included pens also make it more self-contained than Livder’s pom poms, which need a separate surface and attachment method.The set is a better fit for guided craft sessions than CVNDKN’s open-ended materials. We can assign shapes, write names, or decorate pieces for a shared tree; with pipe cleaners, we would first need to decide what to build. That structure is useful for a family activity or classroom station, but it narrows the kind of project: shoppers seeking sculptural figures or a broad mix of loose embellishments may find CVNDKN more flexible. The product description says the wood is polished and has holes for hanging, though it does not specify dimensions, so we should not assume the pieces are large.One practical caveat is that the listing describes 158 pieces, while its component breakdown totals 158 only when the 50 wood slices, 50 twine, 50 bells, and eight pens are combined. The supplied text also describes ten styles with five pieces of each, which accounts for 50 wooden shapes. We should view this as a coordinated ornament activity, not a complete general-purpose art kit; extra markers, paint, or glue may be useful depending on our designs. For projects with a clear holiday outcome, this is the most directed option in the lineup.
Pros:
- Ten holiday shapes provide an easy starting point for themed projects.
- Includes twine and colorful bells for turning decorated pieces into hanging ornaments.
- Eight colorful pens are supplied for basic decorating and writing.
- The smooth, unfinished wooden surfaces are described as ready for coloring.
Cons:
- The project range centers on decorating wooden shapes rather than building free-form crafts.
- The supplied description does not state ornament dimensions or pen type.
- Additional paint, glue, or other embellishments may be needed for more elaborate designs.
Best for: Families, teachers, and craft hosts who want participants to decorate and hang recognizable holiday ornaments.
Not ideal for: Shoppers who want soft, dimensional figures or a broad selection of loose materials for unrestricted sculpting.
Bottom line: We recommend this set when the goal is a structured ornament-making activity with hanging supplies included.
“We recommend this set when the goal is a structured ornament-making activity with hanging supplies included.”
CVNDKN Christmas Pipe Cleaners 700 Pcs Craft Set
CVNDKN is the lineup’s broadest starter mix for crafts that take shape in our hands. The pack combines 200 bendable pipe cleaners, 400 pom poms, and 100 self-adhesive googly eyes, so we can make small animals, decorative figures, or playful classroom creations without sourcing every component separately. Compared with the wooden set, it leaves the final project open: we can bend and combine materials instead of starting from a fixed ornament outline.That freedom makes the set especially suitable for family craft time or a classroom activity where participants want different results. It is less immediately suited to making polished, ready-to-hang decorations, since the listed contents do not include ornament blanks or hanging twine. Livder offers many more pom poms and four stated sizes, while CVNDKN’s advantage is combining pom poms with wire forms and eyes. Its pipe cleaners are 11.8 inches long and described as flexible, but the wire ends can scratch, so young crafters need appropriate supervision.We should also note that the listed colors are holiday-themed, with glitter and polyester varieties, but the description does not provide an exact count for each color beyond the stated 25 pipe cleaners per color across eight colors. The mix encourages experimentation, yet the set depends on a plan—or a willingness to improvise—and some projects may need glue or other finishing supplies. Choose it for variety and shaping; choose the wood kit when we want each participant to leave with a recognizable hanging ornament.
Pros:
- Combines pipe cleaners, pom poms, and adhesive googly eyes in one set.
- Pipe cleaners can be bent into many shapes for figures and decorations.
- Eight stated pipe cleaner colors include holiday-themed shades.
- Useful for varied group projects where participants make different creations.
Cons:
- Wire ends may scratch, so supervision is important for children.
- No ornament blanks or hanging twine are listed.
- Open-ended materials may require extra glue or project planning.
Best for: Families, teachers, and activity leaders planning open-ended holiday crafts with mixed materials and simple figures.
Not ideal for: Buyers who want a guided ornament kit with wooden blanks, hanging cord, or a clearly defined finished project.
Bottom line: We would choose CVNDKN for flexible, mixed-material holiday activities where variety matters more than a ready-made ornament format.
“We would choose CVNDKN for flexible, mixed-material holiday activities where variety matters more than a ready-made ornament format.”
Livder Christmas Pom Poms Pompoms Red Green White Glitter Fluffy Balls, DIY Art Crafts Decorations Supplies (4 Sizes, 900 Pieces)
Livder is the focused choice when our project already has a base and needs soft, festive accents. The pack provides approximately 900 pom poms in red, white, and green, divided across four diameters from 0.4 to 1 inch. That size range lets us add small details to cards or choose larger balls for more visible decorations. Compared with CVNDKN, Livder offers more pom poms and a stated size variety, but it does not include pipe cleaners or googly eyes for building figures.The narrow focus can be an advantage for card-making, garlands, jewelry, or other projects where we want a consistent holiday palette. The description says the polypropylene and glitter foil fibers create a soft, light material, and that the balls can be glued or sewn. Those options broaden how we can attach them, but the kit lists no adhesive, thread, needles, or ornament forms. In contrast, the wooden set supplies pieces designed to hang and some basic decorating tools, so it is more complete for a single defined activity.Livder’s tradeoff is that its impressive quantity is concentrated in one material. If we need varied craft components for a group, CVNDKN gives us more ways to combine textures and shapes. If we already have glue, card stock, or other project materials and simply need color-matched embellishments, Livder is the more targeted pick. Buyers should also account for the glitter element in the fibers and the small loose pieces when planning activities with young children. It excels as an add-on supply, rather than a self-contained ornament-making kit.
Pros:
- Approximately 900 pom poms provide a substantial supply for batch projects.
- Four diameters support both small details and larger decorative elements.
- Red, white, and green colors suit a coordinated holiday palette.
- The description says pom poms can be glued or sewn onto projects.
Cons:
- The pack focuses on pom poms and does not include project bases or adhesive.
- It offers less material variety than CVNDKN’s mixed set.
- Loose small pieces and glitter fibers may not suit every craft space.
Best for: Crafters who already have project bases and need red, green, and white pom pom accents in several sizes.
Not ideal for: Shoppers seeking a complete kit with ornament blanks, hanging accessories, shaping materials, or included adhesive.
Bottom line: We recommend Livder when color-matched pom pom embellishments are the missing ingredient in projects we already know how to assemble.
“We recommend Livder when color-matched pom pom embellishments are the missing ingredient in projects we already know how to assemble.”
As an Amazon Associate we earn from qualifying purchases.
Before You Start
Choose crafts that use overlapping materials. For example, cardstock, markers, glue, and ribbon can support cards, tags, and paper ornaments. Check how many people will participate and how many finished pieces you need. Plan a few extra pieces of paper or decorations for mistakes, but avoid buying a large pack of a specialty item for a single small project.
Put a washable cover over the work surface and move food and drinks away. Keep sharp tools, hot glue guns, and small parts out of reach of young children. Use hot glue only with adults handling the gun, and follow its label. If anyone has sensitivities, check materials and provide a well-ventilated work area.
Step-by-Step Instructions
Step 1: Choose two or three projects
Write down two or three holiday crafts you plan to make, such as folded cards, paper snowflakes, gift tags, or a simple garland. Note the quantity of each item you need and who will make it. Keep the project list short enough to finish with the time and space available.
Tip: Choose projects that share materials, like paper, markers, and ribbon. Shared supplies reduce cost and leave fewer leftover odds and ends.
Check: Your list names each project, its quantity, and the people who will work on it.
Step 2: Check what you already have
Gather craft supplies from drawers, cupboards, and storage boxes. Sort them into paper, coloring tools, adhesives, decorations, and cutting tools. Test markers on scrap paper, check that glue has not dried out, and look for blunt scissors or damaged supplies. Cross usable items off your project list.
Tip: Keep usable scraps of wrapping paper, cardstock, ribbon, and fabric in a separate container. Record their approximate sizes so you can match them to a project.
Check: You have a clear inventory of usable supplies and a shorter list of items to find or buy.
Step 3: Match materials to each project
List the supplies needed for each craft. For a card, you may need cardstock, a pencil, a ruler, markers, and glue. For a paper ornament, add a hole punch and string. For gift tags, include a tag template, scissors, and ribbon. Check whether each item can serve more than one project before adding it to your shopping list.
Tip: Include the basic supplies people often forget: a pencil for marking, scrap paper for testing colors, and a container for small decorations.
Check: Every project has a complete materials list, including its main material, decoration, fastener, and tools.
Step 4: Set quantities and a spending limit
Estimate how much of each material you will use. Count planned cards, tags, or ornaments, then add a small amount of extra paper or decoration for errors. Compare pack sizes and prices, and set a spending limit before shopping. Skip large multipacks when a smaller quantity will cover the project list.
Tip: For shared materials such as glue or markers, count participants and workstations. One shared set may be enough for a small group; a larger group may need extra scissors or coloring tools to avoid waiting.
Check: Your shopping list includes quantities and stays within the limit you set.
Step 5: Choose suitable, easy-to-use supplies
Select paper sturdy enough to hold its shape, such as cardstock for tags and cards. Choose decorations that are easy to attach with the adhesive you have. Read labels for age guidance and handling instructions. Pick washable markers or paints when simple cleanup matters, and choose scissors that fit the users’ hands and abilities.
Tip: Try unfamiliar markers, paint, or glue on scrap material before using them on a finished piece. Colors and adhesives can look different as they dry.
Check: The materials fit the project, the users, and the work area, and any unfamiliar products have been checked.
Step 6: Buy only the missing supplies
Take your list when shopping and mark off each item as you find it. Compare pack sizes with the quantities you calculated. Check the label for the material, intended use, and age guidance, especially for adhesives, paints, and small decorative pieces. Keep the receipt until you have checked that the purchased items are usable.
Tip: When a listed color or decoration is unavailable, choose a similar item that works with the same tools and adhesive. Update the list so it matches what you actually bring home.
Check: You have the supplies that were missing, and the shopping list reflects any substitutions.
Step 7: Sort supplies by project
Place each project’s supplies in its own tray, basket, or clearly marked section of a table. Put shared items, such as scissors and markers, in a central area. Keep small decorations in shallow containers, and keep liquids upright. Set scrap paper and a waste container within reach.
Tip: For a group, prepare one kit per person or workstation. This makes it easier for everyone to begin and reduces crowding around shared tools.
Check: You can find each project’s materials without searching through mixed bags or boxes.
Step 8: Prepare the work area and test the materials
Cover the table, set out the first project’s supplies, and leave room for finished pieces to dry. Test the adhesive and coloring tools on scraps of the same material. Confirm that the glue holds and that the ink or paint does not bleed through in a way that affects the design. Follow product labels for drying and cleanup.
Tip: If you plan to layer paper or attach heavier decorations, test that combination on a spare piece. A flat scrap test can reveal weak glue before it spoils a finished craft.
Check: The work surface is ready, the tools work, and the test materials hold together and look as expected.
Common Mistakes to Avoid
- Buying supplies before deciding which crafts to make. — Choose projects and write their material lists first. Check your existing supplies before buying anything.
- Using thin paper for a project that needs to hold its shape. — Use cardstock for cards, tags, and many ornaments. Test a sample if you are unsure whether the paper is sturdy enough.
- Choosing an adhesive that does not work with the materials. — Check the adhesive label and test it on scraps of the same paper or decoration before making the finished item.
- Setting out every supply at once. — Prepare one project at a time, keep shared tools in one spot, and put small decorations in containers to limit spills.
Troubleshooting
Problem: Glue wrinkles or soaks through the paper.
Solution: Use a smaller amount and spread it thinly. Test on a scrap first; for lightweight paper, try a glue stick if its label lists paper as a suitable surface.
Problem: Markers bleed through cardstock or smear.
Solution: Test the marker on scrap paper and let ink dry before adding another layer. Place a spare sheet underneath the piece while coloring.
Problem: The decoration will not stay attached.
Solution: Check that the adhesive suits both materials and press the pieces together as directed on its label. Let the bond dry before moving the craft.
Problem: The work area becomes crowded or messy.
Solution: Pause and return unused supplies to their containers. Keep only the current project’s materials on the table, and move finished pieces to a clear drying area.
What Success Looks Like
You are ready to craft when each planned project has a complete set of materials, the supplies suit the people using them, and the work area is protected and organized. Test pieces should show that the adhesive holds and the coloring tools work on the chosen paper. During the activity, finished pieces should match the planned quantity, stay attached after drying, and be easy to identify by project.
Next Steps
After crafting, follow product labels to clean brushes and tools, close markers and glue, and store remaining supplies by type. Keep dry finished pieces flat until they are ready to display or give away. Note which materials ran short or went unused; use that list to plan the next holiday project with less waste.
Frequently Asked Questions
What basic supplies cover several holiday crafts?
Start with cardstock or construction paper, pencils, markers or crayons, scissors, a paper-friendly adhesive, and string or ribbon. Add decorations such as stickers or scrap wrapping paper only when they match the projects you chose.
How much extra paper should I buy?
Count the pieces required for your planned crafts and add a few extras for testing and cutting mistakes. The right amount depends on piece size and how many people are crafting, so use your project list instead of buying a large pack by default.
What supplies work well for crafts with children?
Choose tools and materials labeled for the children’s ages, such as washable markers, paper, and age-appropriate scissors. Adults should handle hot glue and supervise sharp tools. Keep small decorations away from young children who may put them in their mouths.
How can I keep craft costs down?
Use clean scraps, check what you already own, and select projects that share paper, coloring tools, and adhesives. Buy only the missing quantities on your list, and substitute a decoration you already have when it works with the project.
How do I know whether glue or paint is suitable?
Read the product label for the surfaces it supports, handling directions, and cleanup method. Test it on a scrap of the same material and let the sample dry before using it on a finished craft.